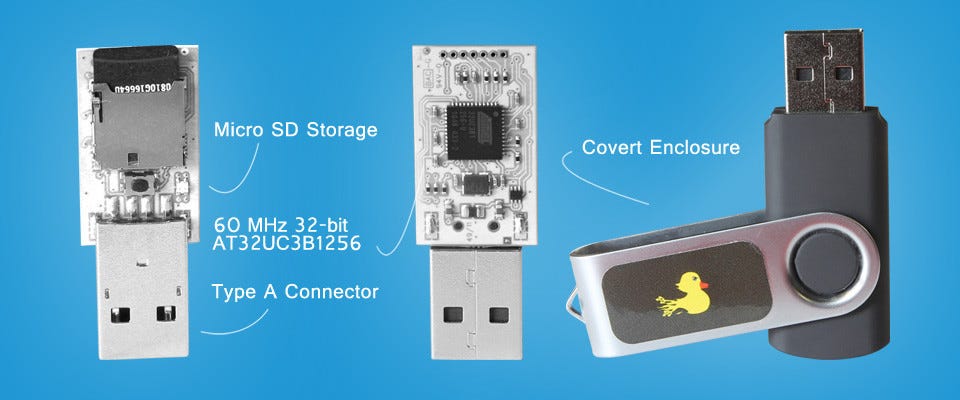
The USB Rubber Ducky is a powerful tool for penetration testers and cybersecurity enthusiasts. It mimics a keyboard to execute pre-programmed keystrokes, making it ideal for ethical hacking, automation, and security testing. However, official Rubber Duckies can be expensive. In this guide, we’ll show you how to create a budget-friendly USB Rubber Ducky using affordable components. Whether you’re a beginner or a seasoned pro, this DIY project is perfect for learning and experimentation.
What is a USB Rubber Ducky?
A USB Rubber Ducky is a keystroke injection tool that looks like a regular USB flash drive. When plugged into a computer, it acts as a keyboard and executes pre-written scripts at lightning speed. It’s widely used for:
- Penetration Testing: Simulating attacks to identify vulnerabilities.
- Automation: Automating repetitive tasks.
- Security Awareness: Demonstrating how easily systems can be compromised.
Why Build Your Own?
- Cost-Effective: Official Rubber Duckies cost around $50–$100, but a DIY version can be built for under ₹1,000.
- Customizable: You can tailor the device to your specific needs.
- Learning Opportunity: Gain hands-on experience with hardware and scripting.
Materials Needed
Here’s what you’ll need to build your budget-friendly USB Rubber Ducky:
- Digispark Attiny85 Development Board (₹200–₹300): A microcontroller that mimics a keyboard.
- Micro USB Cable (₹50–₹100): For programming the Digispark.
- Arduino IDE (Free): Software to write and upload scripts.
- USB Rubber Ducky Scripts (Free): Pre-written scripts or custom ones you create.
- Optional: Enclosure (₹100–₹200): A 3D-printed or DIY case to protect the device.

Step-by-Step Guide
Step 1: Set Up the Arduino IDE
- Download and Install Arduino IDE:
Visit the Arduino website and download the IDE for your operating system. - Add Digispark Board Support:
- Open Arduino IDE and go to File > Preferences.
- In the Additional Boards Manager URLs field, paste this link:
http://digistump.com/package_digistump_index.json - Go to Tools > Board > Boards Manager, search for Digistump AVR Boards, and install it.
- Select the Digispark Board:
- Go to Tools > Board and select Digispark (Default – 16.5 MHz).
- Set the Programmer to Micronucleus.
Step 2: Write Your Script
- Understand Ducky Script:
Ducky Script is a simple scripting language used for Rubber Ducky payloads. For example:
   DELAY 1000
   GUI r
   DELAY 500
   STRING cmd
   ENTER
   DELAY 500
   STRING echo Hello, The Cyber Monk!
   ENTER
This script opens the Command Prompt and types a message.
- Convert Ducky Script to Arduino Code:
Use online tools like the Duck2Spark Converter to convert your Ducky Script into Arduino-compatible code.
Step 3: Upload the Script to Digispark
- Connect the Digispark:
Plug the Digispark into your computer using the micro USB cable. - Upload the Code:
- Copy the converted Arduino code into the IDE.
- Click the Upload button.
- When prompted, unplug and replug the Digispark to complete the upload.
Step 4: Test Your DIY Rubber Ducky
- Plug It In:
Insert your DIY Rubber Ducky into a computer. - Observe the Results:
The device will execute the script automatically. For example, it might open a Command Prompt and display a message.
Step 5: Optional – Add an Enclosure
- Use a 3D-printed case or create a DIY enclosure using materials like plastic or cardboard to protect the Digispark board.
Applications of Your DIY Rubber Ducky
- Ethical Hacking: Test systems for vulnerabilities.
- Automation: Automate repetitive tasks like logging in or opening applications.
- Security Awareness: Demonstrate how easily systems can be compromised.
Safety and Ethical Considerations
- Use Responsibly: Only use your DIY Rubber Ducky on systems you own or have permission to test.
- Stay Legal: Unauthorized use of such devices is illegal and unethical.
- Educate Others: Use your device to raise awareness about cybersecurity risks.
Why Choose The Cyber Monk?
At The Cyber Monk, we believe in making cybersecurity accessible to everyone. Our mission is to provide beginner-friendly guides, budget-friendly solutions, and ethical hacking resources to help you stay safe in the digital world.
Conclusion
Building a budget-friendly USB Rubber Ducky is a fun and educational project that can enhance your cybersecurity skills. By following this guide, you can create a powerful tool for ethical hacking and automation without breaking the bank. Remember to use your device responsibly and always prioritize ethical practices.
For more cybersecurity tips, guides, and resources, visit The Cyber Monk . Stay curious, stay safe! 🚀
Sources:
- Digistump: Digispark Attiny85 Documentation
- Hak5: USB Rubber Ducky Wiki
- Arduino: Arduino IDE Download
This article is part of The Cyber Monk’s commitment to making cybersecurity accessible and affordable for everyone. Follow us for more DIY projects and ethical hacking guides! 🛠️


